The most common requirement of any software system is securing data source and accessing it in a same manner. If you’re hosting your infrastructure in an ever-evolving cloud environment — there are a few “latest and greatest” this article will explore, specifically Private Service Connect and GKE Workload Identity services in Google Cloud Platform, as well as managing private GKE cluster via Bastion jump host.
This is a lot to cover, so it will be a streamlined guide.
The image below is not a production-ready setup. It’s a POC — as of Q1 2024, it is still among the most recommended setups with GKE cluster and Cloud SQL instance.
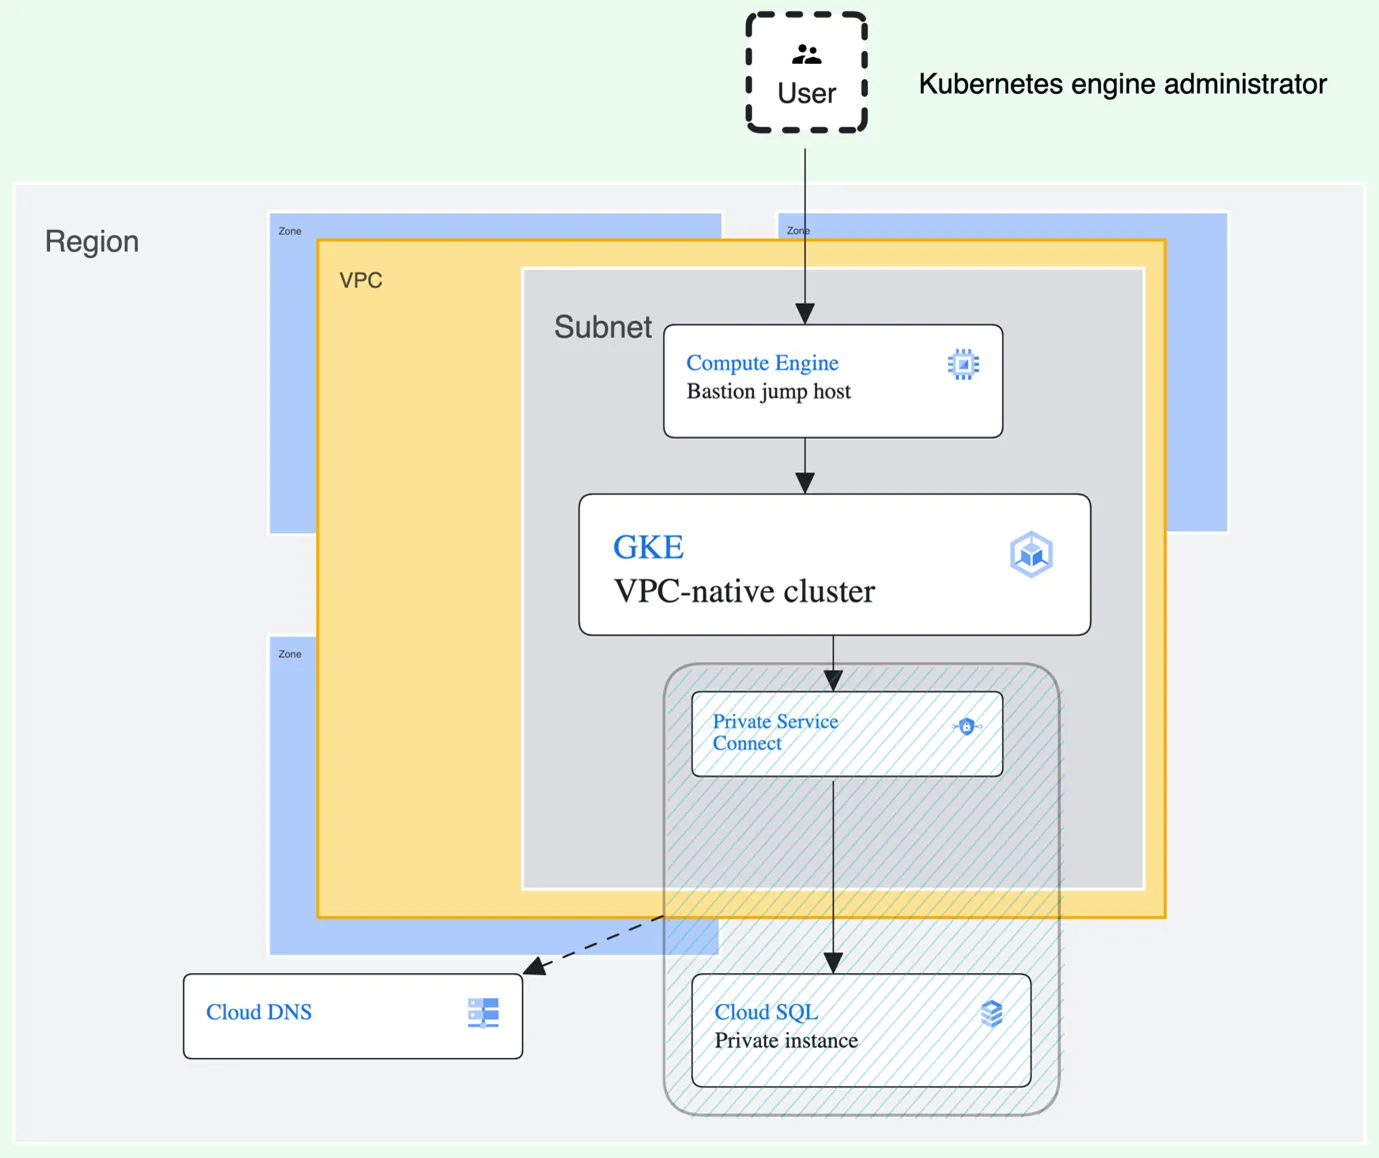
As already mentioned, but not shown in the image above, management of workload permissions will be done by GKE Workload Identity which simplifies access management for Kubernetes workloads (as opposed to Workload Identity Federation, which handles external applications accessing Google Cloud resources).
The whole setup is managed by Terraform for consistency and easier cleanup, so we will continue to use this approach throughout the guide. It also allows for using of modules, specifically for provisioning a private GKE cluster in our case, as you’ll see further below.
Also, since Terraform is not in the spotlight of this article, it is not fully or properly set up. The article contains snippets from a project which, when put together, will result in the infrastructure shown in the image above. The snippets should be separated by modules for separation of concerns and maintainability. There are multiple “locals” blocks which can be merged to one (if keeping everything in a same file) or refactored in some other way. Some, if not most, of the local variables should be declared in variables.tf files and passed around between modules.
Networking
Let’s begin with provisioning private network and subnetwork for GKE cluster:
					locals {
  region = “europe-west8”
}
resource "google_compute_network" "private-vpc-network" {
  name                    = "gke-vpc-network"
  auto_create_subnetworks = false
}

resource "google_compute_subnetwork" "gke-subnet" {
  name          = "gke-subnet"
  region        = local.region
  network       = google_compute_network.private-vpc-network.name
  ip_cidr_range = "10.10.0.0/16"

  secondary_ip_range {
    range_name    = "ip-range-pods"
    ip_cidr_range = "10.20.0.0/16"
  }

  secondary_ip_range {
    range_name    = "ip-range-services"
    ip_cidr_range = "10.30.0.0/16"
  }

  secondary_ip_range {
    range_name    = "master-ipv4-cidr"
    ip_cidr_range = "10.40.0.0/30"
  }
}
As can be seen above, creating VPC is straightforward. As for the GKE-subnet, we’ve opted for explicitly defining our secondary CIDR ranges (primary must be provided either way). They’ll be used to allocate alias IP ranges for GKE services and pods. This will result in provisioning a VPC-native cluster, the benefits of which you can explore here.
The third secondary range will be assigned as authorized network for GKE control plane, but it will not be used — we’ve provided it to fully control the allocation of addresses and avoid overlapping.
Additionally, under the assumption your organization restricted your Compute Engine resources to private IPs (which would be a safe approach), you’d need a way in — to manage your Kubernetes resources, and a way out — for nodes to fetch images and to set up an SSH proxy for Kubernetes management.
A good way in could be using SSH through Identity-Aware Proxy (IAP) tunnel.
This will create an ingress firewall rule which we’ll exploit later with jump host:
					resource "google_compute_firewall" "allow_ssh_ingress_from_iap" {
  name     = "allow-ssh-ingress-from-iap"
  network  = google_compute_network.private-vpc-network.name
  priority = 998

  allow {
    protocol = "tcp"
    ports    = ["22"]
  }

  source_ranges = ["35.235.240.0/20"]
  direction = "INGRESS"
}
The source_ranges value is not random — it’s all IP addresses that IAP uses for TCP forwarding. Port 22 is default for SSH protocol.
A way out is achieved with Cloud Network Address Translation (Cloud NAT):
					resource "google_compute_router" "private-network-nat-router" {
  name    = "my-router"
  region  = google_compute_subnetwork.gke-subnet.region
  network = google_compute_network.private-vpc-network.id
}

resource "google_compute_router_nat" "private-network-nat-gateway" {
  name                               = "bastion-nat-gateway"
  router                             = google_compute_router.private-network-nat-router.name
  region                             = google_compute_router.private-network-nat-router.region
  nat_ip_allocate_option             = "AUTO_ONLY"
  source_subnetwork_ip_ranges_to_nat = "ALL_SUBNETWORKS_ALL_IP_RANGES"
}
This specifically is a public NAT setup, using router and a router gateway.
Identity and access management
Next, we need two service accounts — one for nodes and the other for pods:
					resource "google_service_account" "nodes-service-account" {
  account_id   = "nodes-service-account"
  display_name = "GKE cluster nodes service account"
}
resource "google_service_account" "pods-service-account" {
  account_id   = "pods-service-account"
  display_name = "GKE pod service account"
}
Mechanisms provided for binding a role to a service account are inherently tedious, at least for now, as we can only bind one role per command. Using gcloud tool, it would look like this:
					gcloud projects add-iam-policy-binding $PROJECT_ID \
        --role="$role" \
        --member="serviceAccount:$SERVICE_ACCOUNT_EMAIL"
This would have to be done for each role separately or with a custom script.
It can make sense to create custom roles, but generally, it’s recommended using predefined roles to reduce complexity.
Using Terraform’s HCL, a list of roles for a given service account can be declared and then looped in the resource-provisioning block to repeat the role-granting action:
					locals {
  project-id = PROJECT_ID

  gke-pods-roles  = ["roles/logging.logWriter", "roles/cloudsql.instanceUser", "roles/cloudsql.admin", "roles/dns.reader", "roles/secretmanager.secretAccessor", "roles/secretmanager.viewer"]
  gke-nodes-roles = ["roles/compute.serviceAgent", "roles/artifactregistry.reader", "roles/logging.logWriter"]
  pod-sa-name     = "pods-service-account"
  k8s-namespace   = "default"
}
resource "google_project_iam_member" "gke-pods-roles-binding" {
  for_each = toset(local.gke-pods-roles)

  member  = "serviceAccount:${google_service_account.pod-service-account.email}"
  project = local.project-id
  role    = each.value
}
pod-service-account will need one more role — roles/iam.workloadIdentityUser. This one is, however, being granted to service account differently, because it’s used to employ GKE workload identity later, so we do it separately:
					resource "google_project_iam_member" "workload-identity-user-assignment" {
  project = local.project-id
  role    = "roles/iam.workloadIdentityUser"
  member  = "serviceAccount:${local.project-id}.svc.id.goog[${local.k8s-namespace}/${local.pod-sa-name}]"
}
Since nodes-service-account doesn’t need roles/iam.workloadIdentityUser, only the following will do:
					resource "google_project_iam_member" "gke-nodes-roles-binding" {
  for_each = toset(local.gke-nodes-roles)

  member  = "serviceAccount:${google_service_account.gke-cluster-nodes-service-account.email}"
  project = local.project-id
  role    = each.value
}
google_project_iam_member Terraform resource is used because it’s non-authoritative, members for the role in the current project are not altered. One might say we could have used google_service_account_iam_member, but we had difficulties granting secretmanager.secretAccessor role to pods service account and with this being a POC, we went the easy way.
Cloud SQL instance
We’ve opted for MySQL server, having it being popular still and straightforward. For those who wish to use PostgreSQL or SQL Server, there are some caveats in setting it up for workload identity, so strictly following this guide might not do.
Provisioning MySQL instance and database goes as follows:
					resource "google_sql_database_instance" "sql-db-instance" {
  name             = "gcp-poc-mysql-instance"
  database_version = "MYSQL_8_0_31"
  region           = local.region

  deletion_protection = false

  settings {
    tier              = "db-f1-micro"
    availability_type = "REGIONAL"
    disk_autoresize   = true

    ip_configuration {
      psc_config {
        psc_enabled               = true
        allowed_consumer_projects = [local.project-id]
      }

      ipv4_enabled = false
    }

    backup_configuration {
      enabled            = true
      binary_log_enabled = true
    }
  }
}

resource "google_sql_database" "db" {
  instance  = google_sql_database_instance.sql-db-instance.name
  name      = "gcp-poc-db"
  charset   = "utf8"
  collation = "utf8_general_ci"
}
Not much to add here except to note the ip_configuration block which closes off the instance to all connections until the Private Service Connect is set up.
Regardless of workload identity, we still need to create a database user to represent our workload and to provide the workload some credentials to use for connection:
					resource "random_password" "sql-instance-password" {
  length  = 16
  special = true
}

resource "google_sql_user" "application-user" {
  instance = data.google_sql_database_instance.db-instance-data.name
  name     = "app"
  password = random_password.sql-instance-password.result
}
Then, we’ve simply output the credentials to Google Secret Manager and reference it in our code. Following is an example for application.properties in Spring Boot application:
					spring.datasource.username=${sm://projects/PROJECT_ID/secrets/USERNAME_SECRET_NAME}
spring.datasource.password=${sm://projects/PROJECT_ID/secrets/PASSWORD_SECRET_NAME}
Of course, you can get secrets programmatically as well. For more details, see Secret Management.
This format — sm://projects/PROJECT_ID/secrets/SECRET_NAME — is an ID of a secret. You can output it using HCL like this:
					output "db-username-id" {
  value = google_secret_manager_secret.db-username.id
}
We will not go into details on generating secrets in Secret Manager, but to see how to provision them you can reference the Google provider docs.
Private Service Connect
There are different ways to set up a PSC, depending on the direction and the kind of communication you wish to achieve using it.
For this example, the PSC endpoint was more than enough. It boils down to reserving an internal address from your subnet’s primary range and setting up a forwarding rule between the address and the Cloud SQL instance’s service attachment. Also, setting it up for our SQL instance requires an instance to be fully provisioned and that’s how we’re going to fetch it, as a whole:
					data "google_sql_database_instance" "sql-instance-data" {
  name = google_sql_database_instance.sql-db-instance.name
}
Now the internal address and the forwarding rule:
					resource "google_compute_address" "internal-sql-endpoint-address" {
  name         = "psc-compute-address-${google_sql_database_instance.sql-db-instance.name}"
  region       = local.region
  address_type = "INTERNAL"
  subnetwork   = google_compute_subnetwork.gke-subnet.name
  address      = "10.10.255.240" # Arbitrary, freed up address from primary subnet range
}
resource "google_compute_forwarding_rule" "internal-sql-address-forwarding-rule" {
  name                    = "psc-forwarding-rule-${google_sql_database_instance.sql-db-instance.name}"
  region                  = local.region
  network                 = google_compute_network.private-vpc-network.name
  ip_address              = google_compute_address.internal-sql-endpoint-address.self_link
  allow_psc_global_access = true
  load_balancing_scheme   = ""
  target                  = data.google_sql_database_instance.sql-instance-data.psc_service_attachment_link
}
At this point, you’re good to go — you can access your instance via the reserved address from your VPC. However, if you want to go a step further, you can slap a DNS mapping over it and that way allow yourself to use Cloud SQL Auth Proxy with your workload as a sidecar(check here for benefits).
Once created, the Cloud SQL instance will provide a recommended dns_name — it’s recommended to use it for following setup. It comes in a format such as i1a23b4cd5e67.1a2b345c6d27.europe-west8.sql.goog.
When provisioning a DNS zone, we’ll only need europe-west8.sql.goog., so the regex nonsense you’ll see down below is extracting that part from the whole dns_name. When provisioning a DNS record set, on the other hand, we’ll use the full dns_name.
					resource "google_dns_managed_zone" "private-dns-zone" {
  name     = "private-dns-zone"
  dns_name = regex("${local.region}\\.[a-z]{3}\\.[a-z]{4}\\.$", data.google_sql_database_instance.sql-instance-data.dns_name)

  visibility = "private"

  private_visibility_config {
    networks {
      network_url = google_compute_network.private-vpc-network.id
    }
  }
}

resource "google_dns_record_set" "sql-psc-dns-record-set" {
  name         = data.google_sql_database_instance.sql-instance-data.dns_name
  managed_zone = google_dns_managed_zone.private-dns-zone.name
  type         = "A"

  rrdatas = [google_compute_address.internal-sql-endpoint-address.address]
}
Now, when setting up Cloud SQL Auth Proxy sidecar, you can simply reference the instance by its instance connection name:
					        - name: cloud-sql-proxy
          image: gcr.io/cloud-sql-connectors/cloud-sql-proxy:2.8.0
          args:
            - "--psc"
            - "--structured-logs"
            - "--port=3306"
            - "PROJECT_ID:europe-west8:gcp-poc-db"
          securityContext:
            runAsNonRoot: true
          resources:
            requests:
              memory: "2Gi"
              cpu: "1"
As for the application, it sees the proxy as a local server, so the following will suffice:
spring.datasource.url=jdbc:mysql://127.0.0.1:3306/gcp-poc-db
Google Kubernetes Engine
With Kubernetes, we’ve found a convenient way to make our life easier — we’ve used a submodule, specifically terraform-google-kubernetes-engine of terraform-google-modules. While this does leave us with an opinionated cluster, it’s a cluster we’re happy with in this case:
					module "gke" {
  source                   = "terraform-google-modules/kubernetes-engine/google//modules/private-cluster"
  project_id               = local.project-id
  name                     = "gcp-poc-gke-cluster"
  regional                 = true
  region                   = local.region
  deletion_protection      = false
  node_metadata            = "GKE_METADATA"
  identity_namespace       = "${local.project-id}.svc.id.goog"
  remove_default_node_pool = true
  initial_node_count       = 0
  ip_range_pods            = google_compute_subnetwork.gke-subnet.secondary_ip_range[0].range_name
  ip_range_services        = google_compute_subnetwork.gke-subnet.secondary_ip_range[1].range_name
  network                  = google_compute_network.private-vpc-network.name
  subnetwork               = google_compute_subnetwork.gke-subnet.name
  service_account          = google_service_account.nodes-service-account.email

  node_pools = [
    {
      name           = "gke-cluster-node-pool"
      machine_type   = "e2-standard-4" # --> less resources could be used if not running Cloud SQL auth proxy as a sidecar (e2-medium for example)
      node_locations = “europe-west8-a,europe-west8-b”
      min_count      = 1
      max_count      = 2
      disk_size_gb   = 30
    }
  ]

  master_authorized_networks = [
    {
      cidr_block   = google_compute_subnetwork.gke-subnet.secondary_ip_range[2].ip_cidr_range
      display_name = google_compute_subnetwork.gke-subnet.secondary_ip_range[2].range_name
    }
  ]

  enable_private_nodes    = true
  enable_private_endpoint = true
}
Applying this code snippet provisions private GKE cluster. Private clusters are a kind of VPC-native clusters — ip-range-pods and ip-range-services ensures no custom static routes are needed. Subsequently, setting both enable_private_nodes and enable_private_endpoint to true is ensuring both nodes and control plane’s endpoint are not by default accessible from the internet.
Two more note-worthy lines are:
- indentity_namespace = “#{project_id}.svc.id.goog” — declaring identity_namespace is enabling GKE workload identity for workloads.
- node_metadata = “GKE_METADATA” — Kubernetes Engine metadata server facilitates workload identity, so we want its API exposed to workloads.
At this point, one might wonder how to access services running in the cluster if everything is cutoff from the internet. Well, in this specific case, we have a single workload, a single NodePort type service and a single ingress controller — of which, the last one does the job.
As for the management of the cluster — we’ve already partially addressed this by provisioning the firewall rule for SSH over IAP. Now, all that remains is to provision and set up a VM instance to host our proxy server.
Bastion host (jump host)
					resource "google_compute_instance" "bastion-host" {
  name         = "bastion-host"
  machine_type = "e2-micro"
  zone         = “europe-west8-a”

  boot_disk {
    initialize_params {
      image = "ubuntu-os-cloud/ubuntu-2204-lts"
    }
  }

  network_interface {
    network    = google_compute_network.private-vpc-network.name
    subnetwork = google_compute_subnetwork.gke-subnet.name
  }

  metadata_startup_script = file("${path.module}/bastion-startup-script.sh")
}
Not much to explain here; since it’s a proxy with notoriously small throughput (with reason), it’s e2-micro. Ubuntu was an arbitrary choice — it’s familiar. Startup script is where the “magic” happens:
					sudo sed "s/.*nrconf{restart}.*/\$nrconf{restart} = \'a\';/" /etc/needrestart/needrestart.conf > tmp-nr.conf && mv tmp-nr.conf /etc/needrestart/needrestart.conf

sudo apt update && sudo apt upgrade -y
sudo apt install tinyproxy -y

sudo sed '/^Allow 127.0.0.1$/a\
Allow localhost
' /etc/tinyproxy/tinyproxy.conf > tmp-proxy.conf && mv tmp-proxy.conf /etc/tinyproxy/tinyproxy.conf

sudo service tinyproxy restart
The first couple of lines is telling package manager to restart all the services that might need restart after upgrade. Without this line, package manager will hang in the background, waiting for input in a prompt you never got and will never reach the remaining commands.
There is a chance that one of the packages that needs upgrades is openssh-server. This will also prompt for some input and will ultimately lead to the same result. If you wish to avoid this, you can also mark openssh-server to be ignored by package manager by adding sudo apt-mark hold openssh-server at the beginning of the file.
Then we have our upgrades, installation of Tinyproxy and minor config adjustment. This should be all.
If steps we address after this don’t work as expected, you can make sure the port in /etc/tinyproxy/tinyproxy.conf is 8888.
Connect to the cluster from local environment
Without going into too much debt about Kubernetes manifests, it’s time to connect and deploy your resources.
First, we need to fetch credentials for Kubernetes cluster:
gcloud container clusters get-credentials gcp-poc-gke-cluster --region europe-west8
Then we need to route the traffic over our proxy; we do that by “SSH-ing” into our jump host. Open new terminal session and run:
					gcloud compute ssh bastion-host \
        --tunnel-through-iap \
        --project PROJECT_ID \
        --zone europe-west8-a \
        --ssh-flag "-4 -L8888:localhost:8888 -N -q -f"
Immediately after:
export HTTPS_PROXY=localhost:8888
Test if it works:
kubectl get nodes
If you didn’t get a list of nodes as a response, don’t sweat it; 4/5 times, opening a new terminal session and starting from top (gcloud compute ssh…) will solve the problem. The fifth time, you might need to go to GCP console and SSH directly into VM to check whether all set up properly:
- apt list –installed | grep tinyproxy
- sudo systemctl status tinyproxy
- /etc/tinyproxy/tinyproxy.conf port is 8888
- `Allow localhost` is added to /etc/tinyproxy/tinyproxy.conf via startup script
- Double-check whether the jump host is in the right subnet
Once you successfully connected to GKE, keep managing it from the existing terminal session, or add your HTTPS_PROXY env variable as global. This way, it should be accessible across the system.
When you want to stop listening on a remote host, run (on MacOS):
lsof -i -n -P | grep 8888 | awk '{print $2}' | grep -o '[0-9]\\+' | sort -u | xargs sudo kill
Kubernetes manifest
One more part of one manifest we do have to address. After you’ve successfully reached your remote cluster over SSH, you need to create Kubernetes service account:
kubectl create serviceaccount -n default k8s-pod-service-account
This is the service account you need to mount with your workload deployment, but for it to be able to employ GKE workload identity, it needs to be annotated with the existing GCP service account we’ve created in the IAM section of this article. After this, make sure it’s mounted with your deployment.
k8 annotate serviceaccount -n default k8s-pod-service-account iam.gke.io/gcp-service-account=pod-service-account-mapped@PROJECT_ID.iam.gserviceaccount.com
					apiVersion: apps/v1
kind: Deployment
metadata:
  name: APP_NAME
spec:
  selector:
    matchLabels:
      name: APP_NAME
  replicas: 2
  template:
    metadata:
      labels:
        name: APP_NAME
    spec:
      serviceAccountName: k8s-pod-service-account # Kubernetes service account
      nodeSelector:
        iam.gke.io/gke-metadata-server-enabled: "true"
      containers:
        - name: APP_NAME
          image: your.docker.image.registry/APP_NAME:tag

                          * * * * * * * *

        - name: cloud-sql-proxy
          image: gcr.io/cloud-sql-connectors/cloud-sql-proxy:2.8.0
          args:
            - "--psc"
            - "--structured-logs"
            - "--port=3306"
            - "PROJECT_ID:europe-west8:gcp-poc-db" # instance connection name
          securityContext:
            runAsNonRoot: true
          resources:
            requests:
              memory: "2Gi"
              cpu: "1"
That’s it. You’re only left to apply your service and ingress manifests, and you’ll have a secured, working setup. I hope this guide met your expectations. You can see our full Terraform setup with some extras on GitHub. If you have any additional advice, we’re looking forward to your comments below.