Serverless architecture is a modern approach to software development that enables developers to build and run applications without the need to manage or provision servers. In this model, the cloud provider manages the infrastructure, allowing developers to focus on writing code and deploying applications.
This article will discuss the reasons for using serverless architecture, its pros and cons, and arguments for each point.
Pros of serverless architecture
-
Cost-effectiveness: You only pay for the compute resources that you actually use. It’s particularly beneficial for applications with variable workloads, as serverless platforms can automatically scale up and down based on demand.
-
Scalability: Serverless architecture allows applications to scale automatically with the number of users or requests. This eliminates the need for manual intervention and planning for capacity, which can be time-consuming and error-prone.
-
Faster time-to-market: This allows for faster development cycles and a quicker time-to-market for new products and features.
- Reduced maintenance: With the cloud provider managing the infrastructure, there is less need for developers to maintain and monitor servers.
Cons of serverless architecture
- Vendor lock-in: Relying on a specific cloud provider’s serverless platform may lead to vendor lock-in, making it difficult to switch providers or use multiple providers.
-
Cold starts: When a serverless function is invoked for the first time, or after a period of inactivity, it can take longer to start due to the need to initialize the environment. This can lead to increased latency and a potentially negative impact on user experience.
-
Limited control: Serverless architecture provides less control over the infrastructure and environment compared to traditional architectures. This may be a drawback for applications with specific performance or security requirements.
- Complexity: While serverless architecture can simplify many aspects of application development, it can also introduce new complexities. For instance, developers need to manage and coordinate multiple small, stateless functions, which can be more complex than dealing with monolithic applications.
In conclusion, serverless architecture offers many benefits. However, like anything it has some drawbacks. When considering serverless architecture, it’s essential to weigh the pros and cons against your specific application requirements and organizational needs to determine if it’s the right fit for your project.
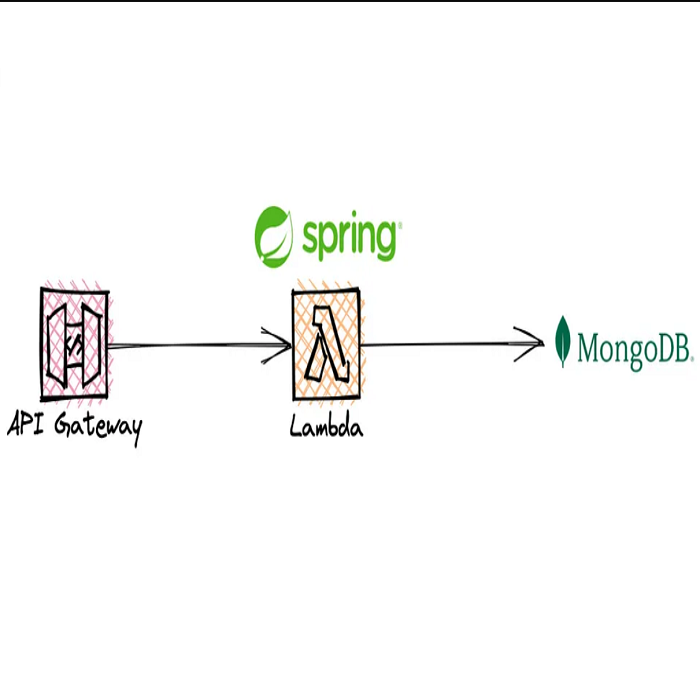
To provide a compelling solution for potential clients, Levi9 decided to partner up with AWS and make a serverless POC with intent to leverage and put to the test their most powerful tooling for creating serverless apps, AWS Cloud Development Kit (CDK) for python.
What came out of it was a proof of concept that has the basic blocks needed to get you up and running in the serverless world in the matter of hours.
You can check out Serverless backend blueprint with Levi9 solution by clicking here.
AWS CDK — Developer-friendly Infra-as-Code tool
In the rapidly evolving world of cloud computing, developers are constantly on the lookout for cutting-edge solutions to simplify their work. Enter the AWS CDK, a game-changing framework that has revolutionized the process of building serverless applications. It’s widely used AWS software development framework and Infra-as-a-Code tool for provisioning infrastructure in fast, scalable and secure way. CDK lets you automate setup and configuration tasks in a reproducible way on a higher level of abstraction.
In this brief overview, we’ll delve into the core advantages of CDK, exploring its unique features and best practices that can transform your serverless infrastructure. By harnessing the power of CDK, you’ll be well-equipped to create scalable, efficient, and cost-effective serverless applications, unlocking new possibilities in cloud computing. So, let’s embark on this journey and discover the art of building serverless apps with CDK. We’ll also give a real world example by walking you through the serverless POC that we made.
Below are the biggest advantages of AWS CDK, which make it an excellent choice for building serverless applications:
-
Support for popular programming languages: AWS CDK, natively written for TypeScript applications, allows developers to use familiar programming languages such as TypeScript, JavaScript, Python, Java, C#, and even Go, making it easier to adopt and integrate with existing codebases.
-
Object-oriented and modular approach: AWS CDK uses object-oriented techniques to create a model of your system, enabling you to define and share modules across projects for increased reusability and maintainability.
- Built-in and community construct libraries: AWS CDK comes with built-in construct libraries and community-contributed constructs that can significantly improve your productivity by providing pre-built, customizable components for your infrastructure.
- Developer-friendly: AWS CDK is designed to be developer-friendly, making it more accessible and easier to work with compared to traditional Infrastructure as Code tools like CloudFormation.
- Integration with CloudFormation: AWS CDK provisions your infrastructure by using CloudFormation in the background, providing all the benefits of CloudFormation’s robust and reliable deployment capabilities while adding the flexibility and expressiveness of an imperative approach.
- Increased automation and efficiency: AWS CDK enables developers to build, automate, and manage infrastructure with an imperative approach, which can lead to more efficient workflows and faster deployment cycles.
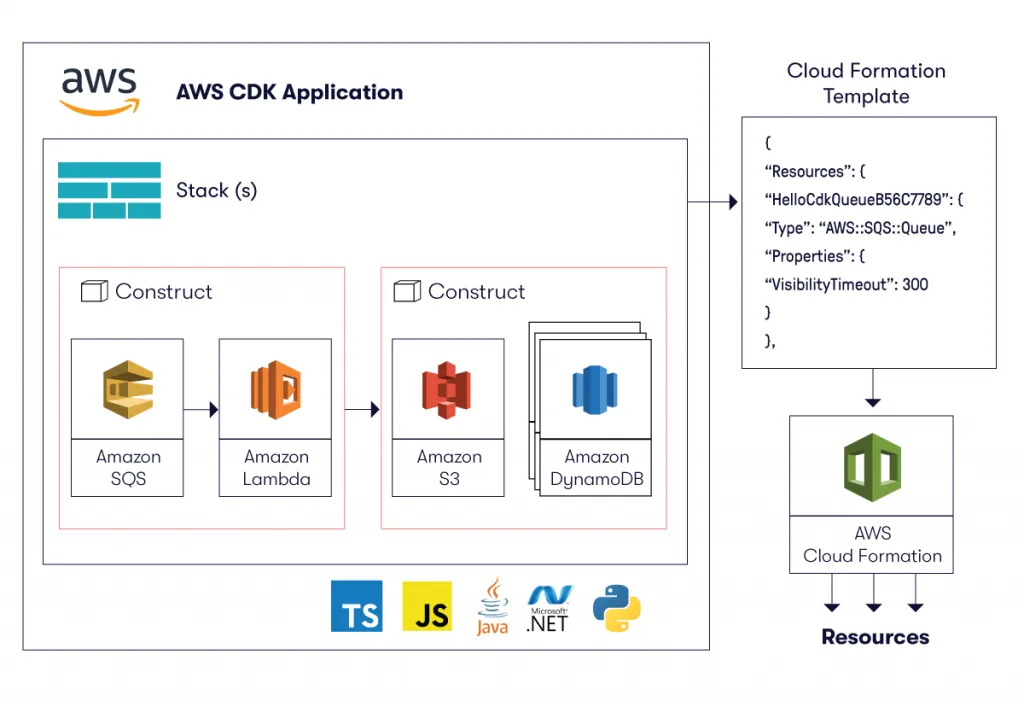
Lets get familiar with three main CDK concepts by looking at the CDK unit hierarchy:
					"App"{
 "Stack"{
 "Construct"{
 set of attributes and methods
 }
 "Methods"
 }
}
Every App contains at least one Stack with at least one Construct — in reality, when working with complex infrastructure it’s a good practice to create multiple stacks to separate the application into logical units, for example one stack for the backend and one for the frontend of the application. Each construct in the stack is a basic building block representing your desired resource with defined attributes and methods (e.g. RDS database instance, API Gateway, S3 Bucket).
But what’s the purpose of a CDK App? It’s just a way to define, control and manage deployment of all resources for the application that you’re building.
Stack in CDK is a unit of deployment. All resources (custom or pre-made) defined within the scope of a stack are provisioned as a single unit. Construct is a basic building block defined and deployed within one stack. It can represent a single AWS resource, or a collection of multiple different, integrated AWS resources.
AWS CDK has it’s own Construct Library with a bunch of ready to use constructs to get you going, and there’s also a Construct hub for community made constructs.
Constructs are divided into three levels based on their level of complexity. Beginning with low-level constructs, CFN Resources or L1 constructs (L1 stands for Layer1), followed by L2 constructs that incorporate some logic and offer some convenience methods, and then, finally we have the L3 constructs also known as patterns, which allow you to easily integrate multiple resources using only one construct (e.g. API Gateway with Lambda function integration).
Modular approach as a reusability booster
We already saw that CDK lets you use an existing skill for defining your infrastructure — a programming language of your choice. Another advantage is the object-oriented and modular approach. Modularity is a fundamental concept in software and system design that promotes the creation of reusable, independent components or building blocks.
These components can be combined and assembled in various ways to form more complex systems and applications. AWS CDK uses a modular approach for creating a model of your system, enabling you to define and share modules across projects for increased reusability and maintainability. Not only are different construct layers provided, but you can also write customized constructs (Custom Constructs) for any use-case you might have. Reusable components can be shared within an organization and used by others. Components can be comprised of existing AWS resources or even be an entirely new custom resource. They can be published to the AWS Construct Library where they’re available for other developers as well.
The power of modularity in AWS CDK comes from its ability to compose and combine constructs to form more complex and custom infrastructure components. You can create higher-level abstractions by nesting constructs within other constructs or by extending existing constructs with additional functionality. This approach enables you to assemble and configure cloud resources in a way that suits your requirements while still keeping the benefits that reusable, manageable, and testable components provide.
By leveraging modularity, AWS CDK allows developers to take advantage of standardization, increased maintainability, and easier collaboration. As a result, teams can work on individual constructs or modules independently, leading to faster development cycles, better code organization, and improved scalability of the cloud infrastructure.
Serverless POC
So, how did we implement modularity in our serverless AWS blueprint app?
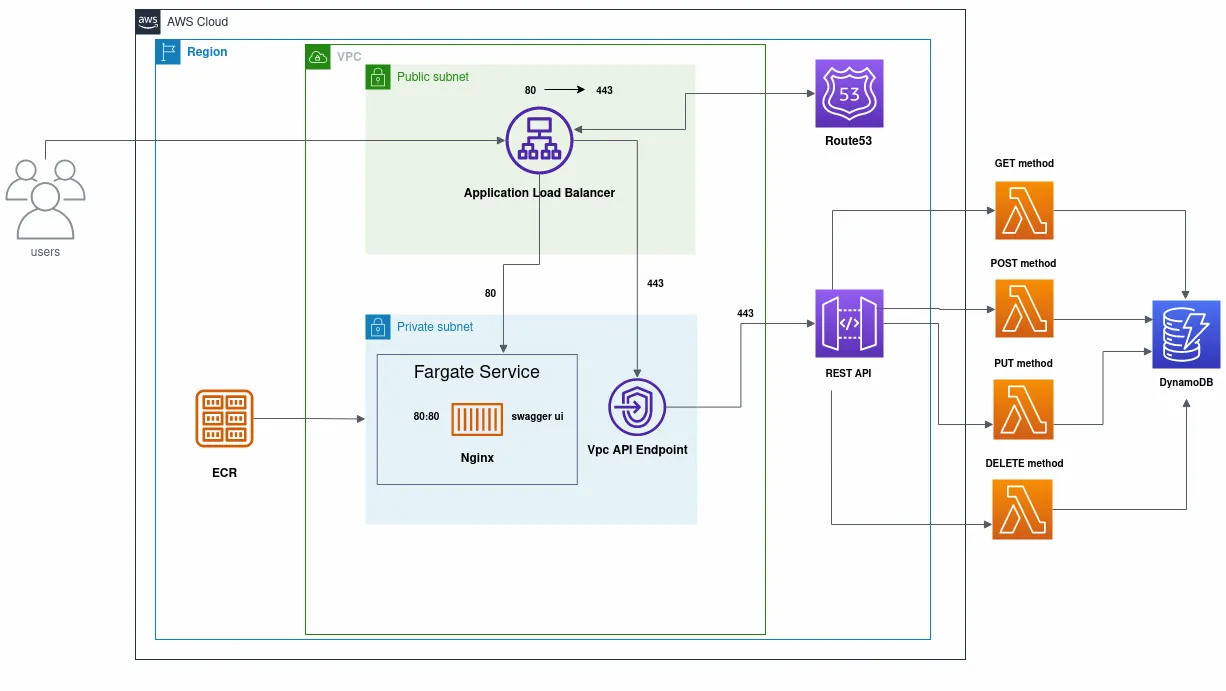
The inspiration behind this article stems from our (successful) attempt to make a serverless POC by using AWS CDK for python — back in late 2022. First, we can take a look at a complete diagram of our serverless infrastructure.
This application was written in Python, one of the most widely used and simple to understand languages in the DevOps world.
User requests are sent to the Application Load Balancer, which is in charge of routing traffic to the Fargate Service, on which an nginx server is running, hosting Swagger UI for testing different REST API methods. Container image on which the server is running is pulled from the Elastic Container Registry or ECR, a secure, scalable, and reliable AWS managed container image registry.
Virtual Private Cloud (VPC) in which app is deployed has private and public subnets. Container attached to a Fargate task, that’s placed in a private subnet, is using a NAT Gateway to pull the desired image from the public registry hosted in ECR. Load Balancer is configured to redirect http traffic to https, and forward it to the VPC Endpoint associated with the REST API.
Serverless lambda functions are used for GET, POST, PUT and DELETE http methods, and responses are stored in a DynamoDB table.
Route53, AWS dns service, is used for all domain related things, but we weren’t restrictive — any dns provider of your choice can be used for hosting the application’s domain.
Sounds interesting so far? Then keep reading and explore the infrastructure provisioning process that uses custom constructs and multiple stacks. As we go through the guide, we’ll give you a look into each stack in more detail.
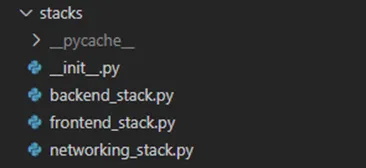
We quickly identified an efficient way to structure our application by organizing it into three units of deployment in CDK:
- Networking stack
- Backend stack
- Frontend stack
These stacks are combined into a single app. All resources can be referenced between stacks that are in the same app.

Each stack would comprise of custom modules and methods for those modules. These modules are created by combining various pre-made constructs on different levels of abstraction.
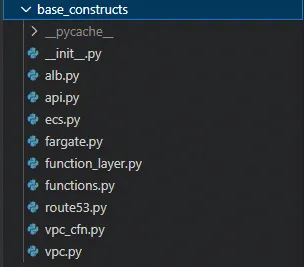
Base constructs, comprised of pre-made constructs (often just a main construct plus security policies and monitoring) are referenced in corresponding stacks.
Modules being used multiple times are referenced and combined, significantly increasing development velocity. One example of that is a module for the Lambda functions. Each stack enables you to set attributes according to your needs and change their values. Once the set of attributes is passed to the specific custom construct, you have a dynamic, customized and scalable resource in your infrastructure.
Network as a starting point
In this stacks walkthrough we will first take a look at the networking stack. This stack is used to create VPC resources required for any further work on the infrastructure. Creation of the VPC is managed by the vpc.py module. Many L2 constructs are paired together to get a custom template for our VPC. We took an advantage of constructs like ec2.SubnetConfiguration, ec2.Vpc, and ec2.InterfaceVpcInterface. When we create a template that works for us, we can import it directly into the code for our networking stack, and implement it in less code than you would expect (and more importantly, code is simple, understandable and reusable.)
Networking stack is a good example for showcasing the basic structure of each stack that’s built and deployed in the project.
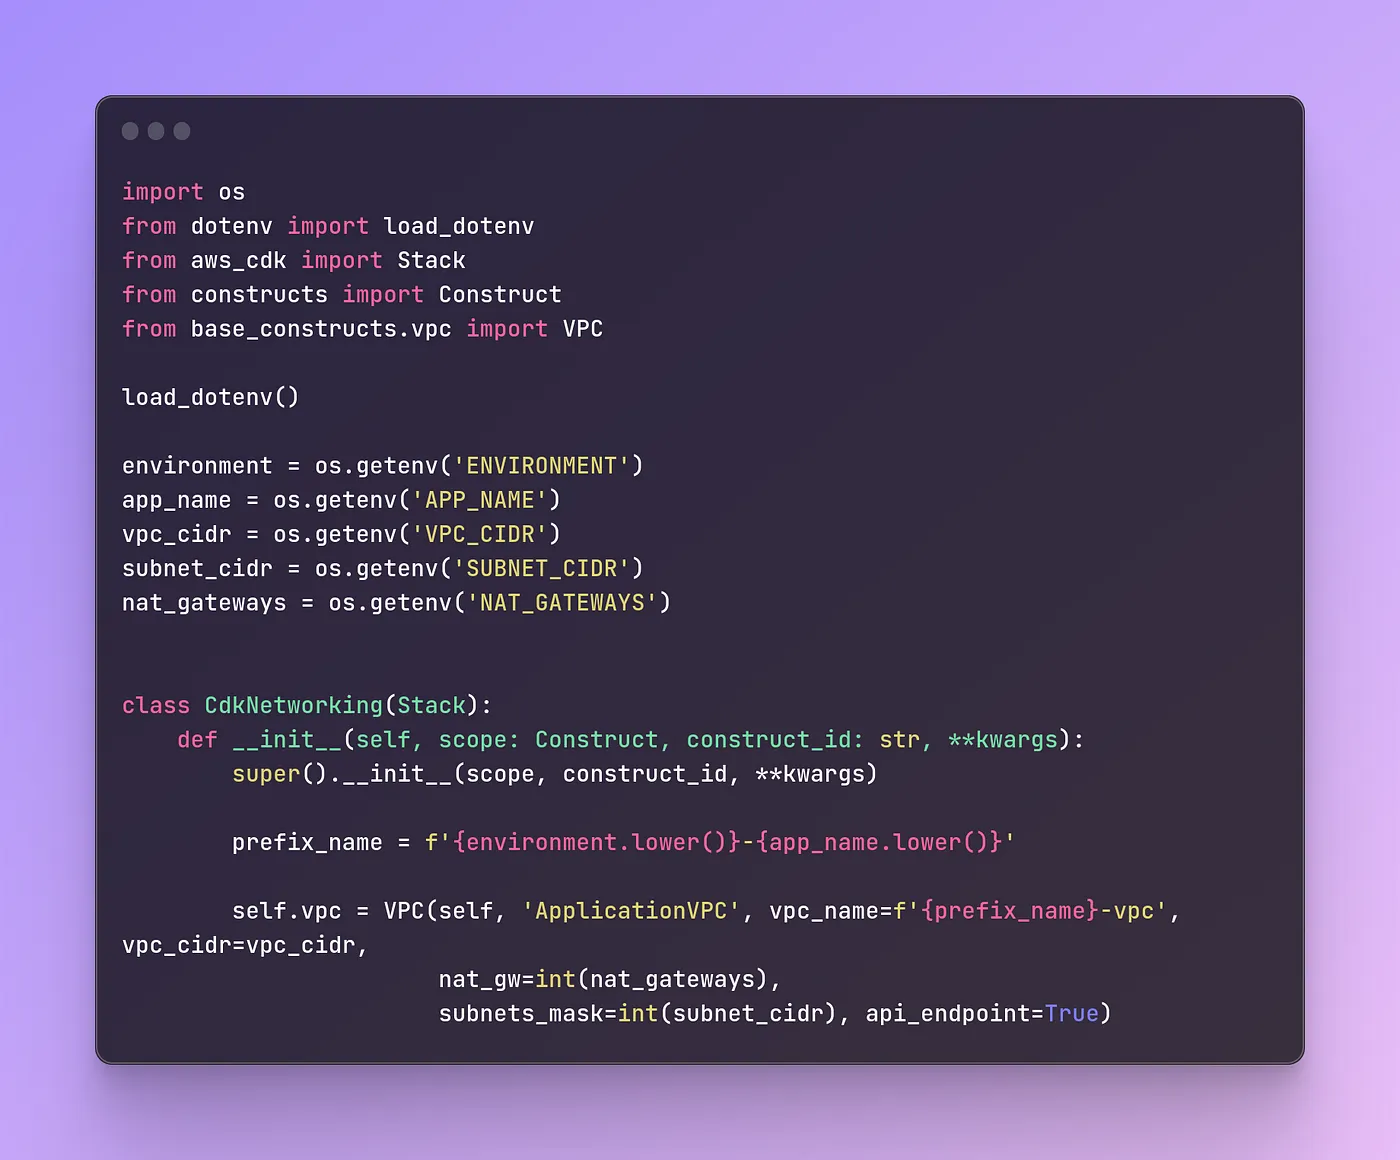
Code below is used to create the VPC through a custom construct. Other network elements such as subnets, mentioned earlier, are also provided in the VPC module, but are not shown in the snippet below.
					class VPC(Construct):
 def __init__(self, scope: Construct, construct_id: str, vpc_cidr: str, vpc_name: str,
 subnets_mask: int, api_endpoint: bool = False, nat_gw: int = 0):
 super().__init__(scope, construct_id)
					if nat_gw > 0:
 self.app_vpc = ec2.Vpc(self, id=construct_id,
 vpc_name=vpc_name,
 nat_gateways=nat_gw,
 cidr=vpc_cidr,
 subnet_configuration=[self.public_subnet, self.private_subnet_configuration]
 )
 else:
 self.app_vpc = ec2.Vpc(self, id=construct_id,
 vpc_name=vpc_name,
 nat_gateways=0,
 cidr=vpc_cidr,
 subnet_configuration=[self.public_subnet, self.isolated_subnet_configuration]
 )
You are allowed to modify the number of used NAT Gateways. Since there’s no need for more than one in this specific case, recommendation is to continue with default value we’ve set. VPC API Endpoint is used within the VPC, it’s associated with the private subnet in which the Fargate Service is running. Through this endpoint Load Balancer is sending https requests to the backend of the application, where they are being processed.
Depending on the chosen cidr block size, corresponding number of subnets is created, which means that both private and public subnets exist in all availability zones in one AWS region (in our case Ireland), meaning that service is highly available.
So, to summarise, we made an entirely separate stack just for the VPC. Depending on the complexity and the structure of the project you are building, sometimes a single VPC solution isn’t the right solution. Maybe you want to separate different parts of the infrastructure in multiple networks that can be peered. Also, it’s a good practice to isolate the project’s networking infrastructure. With this dynamic module, you can create as many VPCs as you need, either by using the existing configuration or a modified version of it. By breaking down the VPC resource into a customized module, we are increasing the overall level of project reusability.
Power engine behind an AWS serverless application
After warming up in the networking section, it’s time to jump to an even more interesting part — heart of the application functionality, the API.
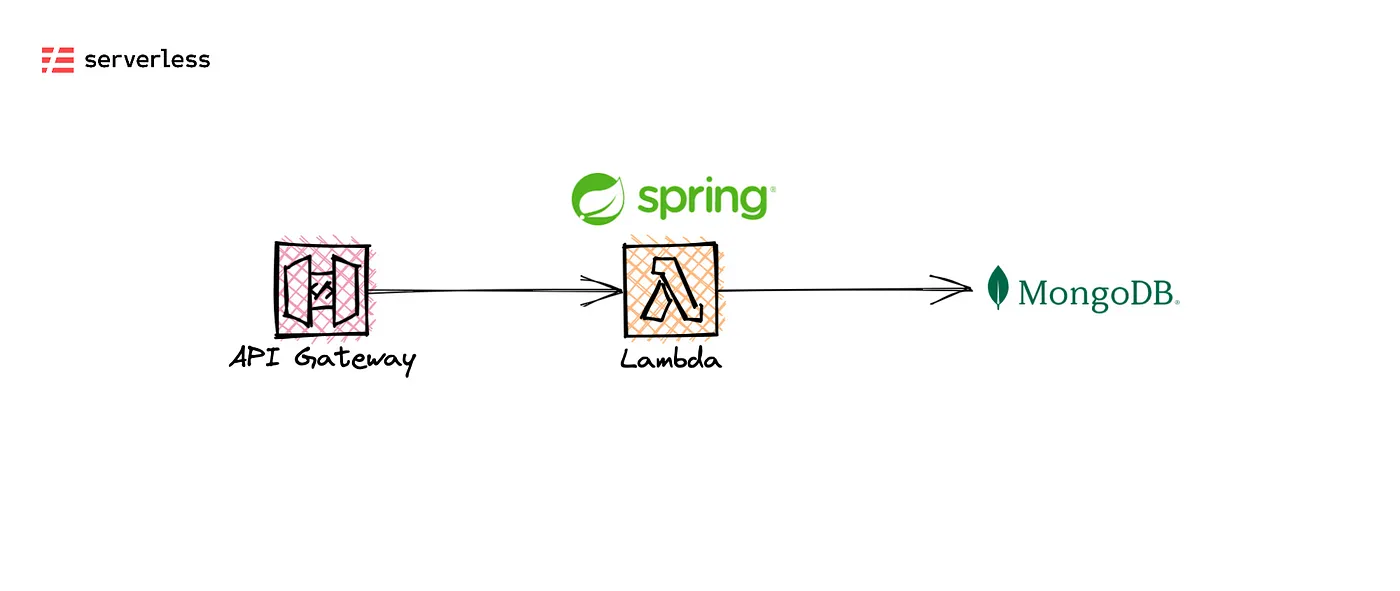
Custom constructs for the backend portion of the infrastructure allow us to abstract and simplify the API Gateway integration with Lambda functions and DynamoDB that would otherwise require a large number of resources.
Here is a piece of the backend code configuration that will demonstrate this explanation.

In the backend stack, we’re creating a couple of very important resources, a RESTful API to access and use the data, Dynamo database to store the data, and last but not least, serverless functions also known as Lambda functions for triggering different http methods. Our Rest API construct contains the base path for the API, it turns on logging, adds security policies and gives us the ability to add a private VPC endpoint, making it robust, secure and complete.
Lambda integration is incorporating security policies and logging as well, allowing us to quickly expand the API and reduce the amount of boilerplate code that’s in the main backend stack file. It can also take the environmental variable for our DynamoDB table name, which we later reference in Lambda to manipulate the data that’s stored in it.
					self.rest_api = apigw.RestApi(self, id=construct_id, rest_api_name=api_name, policy=self.rest_api_policy,
 description=description,
 cloud_watch_role=True,
 deploy_options=apigw.StageOptions(
 logging_level=apigw.MethodLoggingLevel.INFO,
 access_log_destination=apigw.LogGroupLogDestination(self.log_group_api),
 access_log_format=apigw.AccessLogFormat.json_with_standard_fields(
 caller=False,
 http_method=True,
 ip=True,
 protocol=True,
 request_time=True,
 resource_path=True,
 response_length=True,
 status=True,
 user=True
 ),
 tracing_enabled=True,
 data_trace_enabled=True,
 stage_name=environment
 ),
 endpoint_configuration=apigw.EndpointConfiguration(
 vpc_endpoints=[api_endpoint_id],
 types=[apigw.EndpointType.PRIVATE]))
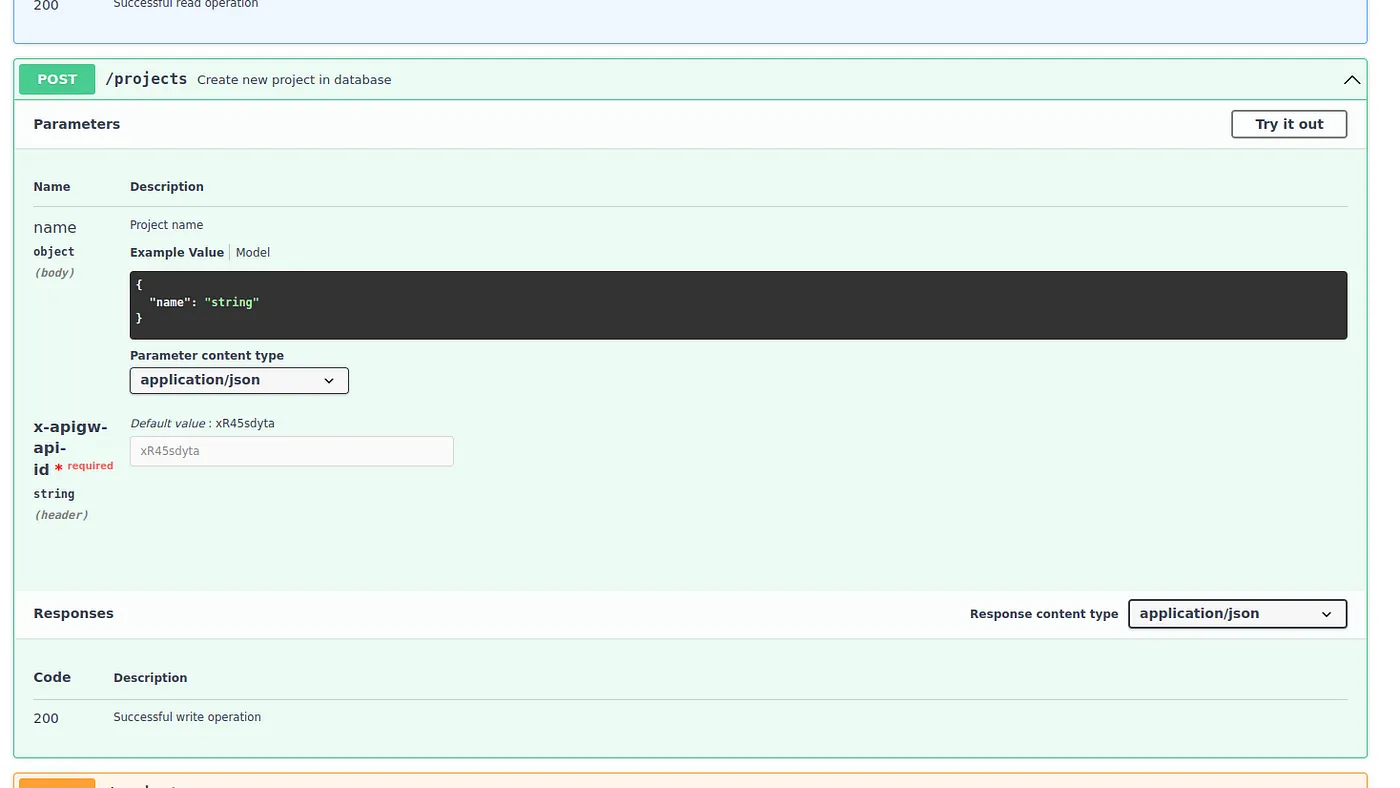
Our API has four Lambda functions used for POST, PUT, GET and DELETE http methods. Each function is using two environment variables — the DynamoDB table name and the AWS app region. These functions are just an example. You can alter the existing ones according to your needs. Functions can delete, create, update and get items from the table (in our case projects) by fetching the item id (project id).
Here’s the code that’s used for the “delete_project” lambda function:
					from boto3 import resource
from botocore.exceptions import ClientError
from logger.logger import log
import os
dynamodb = resource('dynamodb', region_name=os.getenv('AWS_REGION'))
table = dynamodb.Table(os.environ.get('DATABASE'))
def delete_project(event, context):
 if 'params' in event:
 project_id = event['params']['path']['project_id']
 log.info(f'Deleting record from DynamoDB, project_id: {project_id}')
 try:
 table.delete_item(Key={'project_id': project_id})
 response_string = f"Successfully deleted project with project_id: {project_id}"
 response = {
 "outcome:": response_string
 }
 log.info(f"Successfully deleted project with project_id: {project_id}")
 return response
 except ClientError as e:
 log.error(f'Error: {e}')
 raise SystemExit(1)
Last but not least — what about testing?
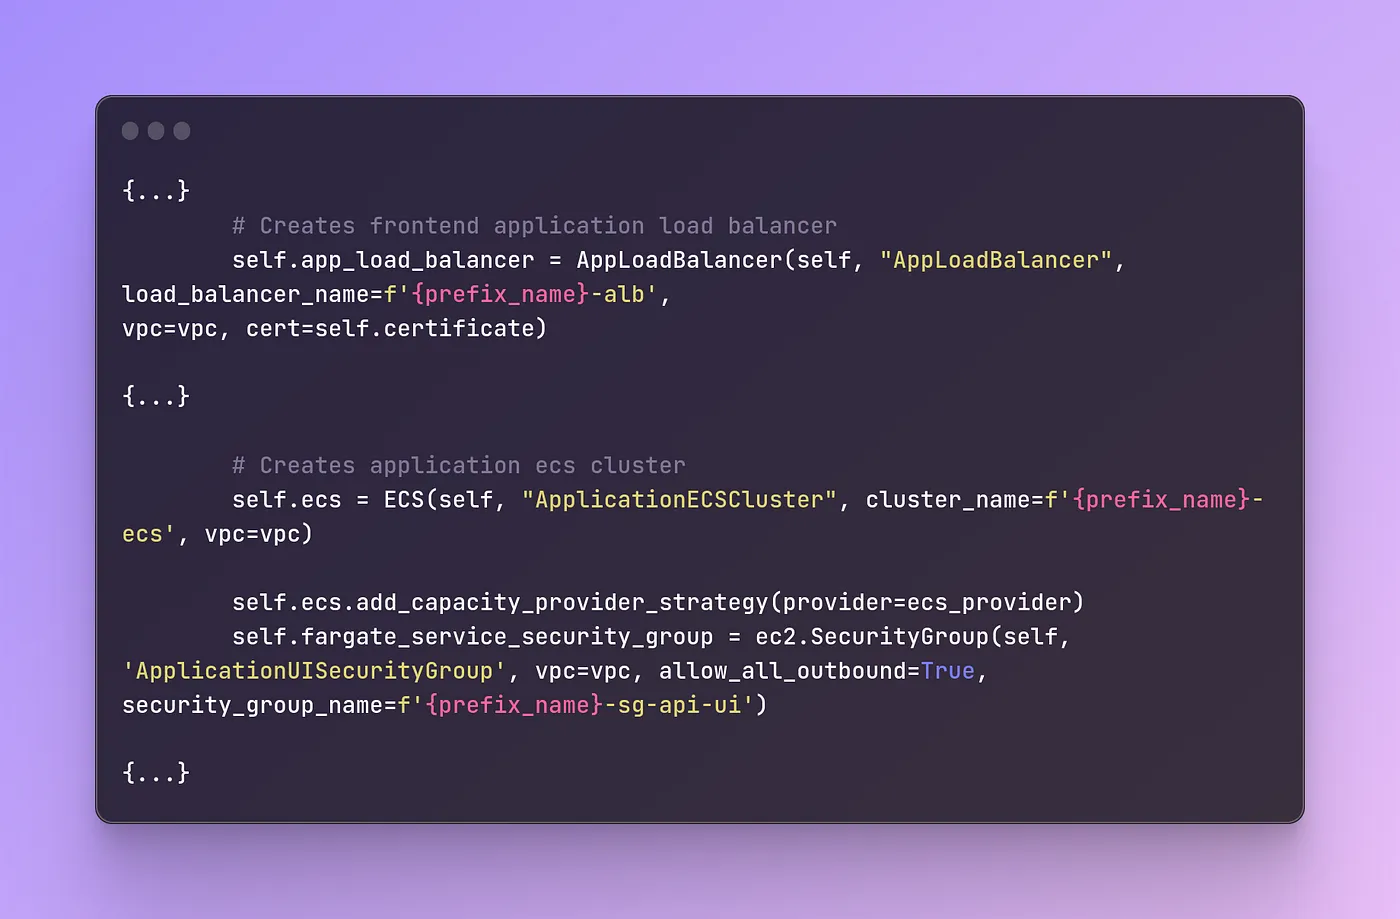
Now it’s a perfect time to ask — but where’s the UI, where can I see what the application is actually doing? Frontend portion of the infrastructure is provisioned for the purpose of hosting the earlier mentioned Swagger UI — an open source tool that generates a web page that documents the APIs generated by the Swagger specification.
This is a user friendly and easy to understand UI solution. This web page allows you to visualize the API responses for each http method. Lambda function is triggered through the lambda integration with the REST API. Frontend Application Load Balancer, ECS cluster, Fargate service and Route53 record for the used domain, are created within a single frontend stack. Option for whitelisting a range of Ipv4 addresses is provided to achieve more restrictive and secure access from the user side to the load balancer.
					if 'IP_WHITELIST' in os.environ:
 if os.getenv('IP_WHITELIST'):
 open_alb = False

 {…}

 if open_alb is False:
 ips = os.getenv('IP_WHITELIST').split(';')
 for ip in ips:
 self.alb_security_group.add_ingress_rule(peer=ec2.Peer.ipv4(ip), connection=ec2.Port.tcp(443))
You have an option to choose a DNS service (in case you don’t want to use AWS Route53). You can also bring your own pre-existing domain certificate — or, let the AWS ACM manage it for you.
					if 'DOMAIN_NAME' in os.environ and 'ACM_ARN' not in os.environ:
 domain_name = os.getenv('DOMAIN_NAME')
 if domain_name:
 # Import hosted zone from registered domain
 self.hosted_zone = Route53(self, 'ApplicationHostedZone', domain_name=domain_name)
# Creates application SSL certificate from Route53
 self.certificate = self.hosted_zone.create_acm_certificate('ApplicationACM',
 domain_name=f"*.{domain_name}")
if 'ACM_ARN' in os.environ:
 if os.getenv('ACM_ARN'):
 # Import ACM certificate in CDK from certificate arn
 self.certificate = certificatemanager.Certificate.from_certificate_arn(self, "ApplicationACM",
 os.getenv('ACM_ARN'))
You can take a look at the part of the code configuration for the frontend stack below.
Like we said, API specification can be seen through the UI, that’s hosted on a Nginx web server and created using a swagger file generator script. And how does the UI looks like? We got you covered.

Conclusion: Any time is the right time for AWS CDK
To conclude, AWS CDK is a game-changer when it comes to infrastructure as code tools. With its innovative approach, developers can now focus on writing code instead of spending countless hours configuring and maintaining infrastructure. Key aspect of agile development is a level of automation you can achieve for infrastructure deployment.
With AWS CDK, creating complex cloud-based applications is faster and easier for developer who want to bring someting new to the market. Custom constructs, multiple stacks and a modular approach — all of these can be achieved with this modern-day infrastructure provisioning solution. With the growing popularity of cloud-based computing, the use of AWS CDK is definitely a step in the right direction for building scalable and reliable infrastructure.
Using AWS CDK removed a lot of friction and made the development experience in Levi9 as pleasant as it can be. Levi9 will continue to use it in the future as a proven competent tool.
Milica Pajić,
Nikola Gospođinački
Levi9 Serbia